Vue Instance
11 Apr 2017Vue Instance
每個 Vue.js 的應用程式都是從 Vue 建構式 (vue constructor) 建立根實體 (root vue instance) 開始,再一個個元件搭建上去而來的。

(大概就像是葡萄串的概念吧!)
建立 Vue Instance
使用 vue constructor 建立 vue instance「vm」,vm 為 view model 的簡稱。
var vm = new Vue({
  //options
});
view model 來自設計模式 MVVM - model、view 和 view model。
傳入選項物件
在實體化時,可傳入一個選項物件,此物件包含掛載點 (el)、資料 (data)、方法 (methods) 等。
如下,傳入一個包含 el、data 的物件。
var vm = new Vue({
  el: '#app',
  data: {
    message: 'Hello World!'
  }
});
擴充建構式
擴充 vue constructor 來建立元件。
var Component = Vue.extend({
data: function () {
return {
msg: 'Hello World 2!'
}
}
});
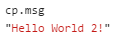
var cp = new Component();
把 cp 倒出來看看,裡面有預先定義好的 data「msg」。
如一開始所說,vue 的應用程式開始於根實體,然後再掛上一個個元件而成,而這些元件都是由已定義好的擴展選項而創建來的。

圖片來源:Composing with Components
注意:綁定的 DOM element (即上例的 el 或 $mount 的位置),不可以是 <html> 或 <body>,只能是自行撰寫的 DOM element,例如:<div id="app">...</div>。如果綁在 <html> 或 <body>,會出現錯誤訊息:

Instance Lifecycle

圖片來源:Lifecycle Diagram
Instance Lifecycle Hooks
Vue.js 提供實體生命週期鉤子 (instance lifecycle hooks),讓我們在 instance 不同時期做一些事情。這裡會使用一些 instance method 來強制進入鉤子。
var vm = new Vue({
  beforeCreate: function() {
    //vue instance 被 constructor 建立前
    console.log('beforeCreate');
  },
  created: function() {
    //vue instance 被 constructor 建立後,在這裡完成 data binding
    console.log('created');
  },
  beforeMount: function() {
    //綁定 DOM 之前
    console.log('beforeMount');
  },
  mounted: function() {
    //綁定 DOM 之後
    console.log('mounted');
  },
  beforeUpdate: function() {
    //資料更新,但尚未更新 DOM
    console.log('beforeUpdate');
  },
  updated: function() {
    //因資料更新,而更新 DOM
    console.log('updated');
  },
  beforeDestroy: function() {
    //移除 vue instance 之前
    console.log('beforeDestroy');
  },
  destroyed: function() {
    //移除 vue instance 之後
    console.log('destroyed');
  }
});
beforeCreate, created
打開 console tab,一開始就會看到

執行 vm.$mount('#app'),讓實體物件綁定 DOM。
vm.$mount('#app');
執行結果

在尚未綁定前會呼叫 beforeMount,綁定後會呼叫mounted。
beforeUpdate, updated
執行 vm.$forceUpdate() 或更新資料,來更新 DOM。
vm.$forceUpdate();
或修改資料
<div id="app">
  ${ message }
</div>
var vm = new Vue({
  el: '#app',
  delimiters: ['${', '}'],
  data: {
    message: 'Hello World!'
  },
  //省略
});

vm.message = 'Message updated!'; //修改資料
執行結果

在尚未更新前會呼叫 beforeUpdate,更新後會呼叫 updated。
備註:由於部落格會把使用雙花括號的內容吃掉,所以另外設定 delimiters 以顯示完整程式碼。
beforeDestroy, destroyed
銷毀 vm。
vm.$destroy();
執行結果

在尚未移除前會呼叫 beforeDestroy,移除後會呼叫 destroyed。
備註
- 一般狀況使用
v-if和v-for來控制資料即可,不需要用到vm.$destroy()。 - 如果是使用 server-side rendering,則除了
beforeCreate和created,其他 method 都不會被呼叫。
總結以上,使用 vue instance 是因為它會幫我們在原本的 DOM element 上加料,意即,所有讓我們在開發時更方便的功能都是由 vue instance 幫我們加上去的,像是雙向綁定,而這樣經由 JavaScript 操作 DOM 的方式不得不歸功於 virtual DOM 讓我們能動手腳。
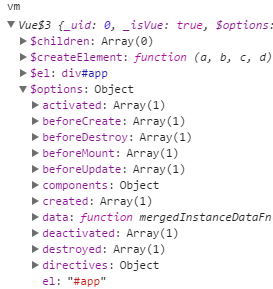
把 vm console 出來看看,是不是加了很多東西!
V-Node
v-node 就是 virtual DOM。一般來說,我們常直接撰寫 HTML 或使用 <template> 來操作元件,但如果我們想用改用 JavaScript 來操作元件?這樣的方式就是操作 virtual DOM,我們可以在 render 來做這件事,如下,建立一個新的 DOM element。
Render Function
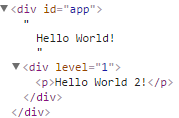
<div id="app">
  ${ message }
  <my-component level="1"></my-component>
</div>
Vue.component('my-component', {
  render: function (createElement) {
    return createElement(
      'div', {},
      [
        createElement('p', 'Hello World 2!'),
      ]
    )
  }
});

var vm = new Vue({
  el: '#app',
  delimiters: ['${', '}'],
  data: {
    message: 'Hello World!'
  }
});
打開瀏覽器的 elements tab 會看到
也可以撰寫 JSX 這種蜜糖語法,再利用 babel plugin 做轉換。
Rendering Flow
來看看如何將撰寫好的 HTML 與 vue instance 結合。

資料來源:Next Vue.js 2.0
說明上圖過程:
- template 經由 HTML parser 解析得到 node object,對這個 object 進行模版語法解析,轉為 AST node,最後生成一棵完整的 AST tree (抽象語法樹,abstract syntax tree)。
- 使用 AST tree 生成渲染函數 (render function),執行渲染函數會得到 v-node。
- watcher 蒐集依賴、經由 observer 對 v-node 做資料綁定和更新。
- v-node 經由 patch 後 render 為真正的 HTML。
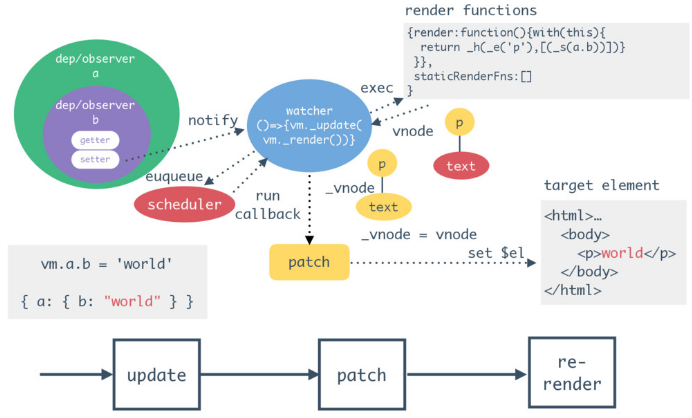
若是已經 parse 過的 template,則會做更新,例如:比對、重新綁定資料、更新必要的 DOM element。
Vue.js 和 React.js 的 virtual DOM 基本上皆使用 snabbdom,並做客製化,這裡有簡易版的說明。


