利用 Bootstrap Grid System 排版的學習筆記
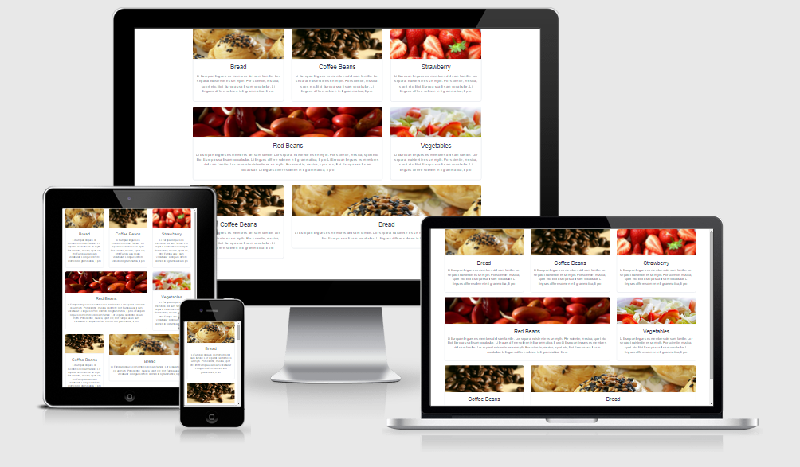
07 Apr 2015利用 Bootstrap Grid System 來排版真是一個方便的方法-若頁面上有許多小方格會隨著解析度而有不同的排列方式,就很適合用 Grid System 來排版。像這樣~
規則
Grid System 是經由 Row(列)和 Column(行)來建立頁面的架構的,然後再將內容裝在這些由 Row(列)和 Column(行)組成的框框裡面。簡述規則如下:
- class 的結構依序為:
.container(固定寬度)或.container-fluid(滿版,看範例) ->.row-> Column。.container或.container-fluid讓版面有適當的對齊方式(alignment)和間格(padding)。 - 使用水平方向的
.row來群組 Column。 - 內容放在 Column 之內,且 Column 一定緊接在
.row之下,是為 Immediate Children。 - 使用 class
.row或.col-xs-4來建立頁面的架構,也可以使用 Less mixins and variables 來做設定或調整。 - Column 為最小單位的方格,且有間格將彼此格開,並由
.row使用負的 margin 值校正因 Column 而多出來的左右 padding。 - 指定 Column 的格數(最多到 12),例如一列希望有 3 個相等的 Column,可指定 3 個
.col-xs-4。 - 基本上一個 Row 放置 12 個 Column,若有一個 Row 超過 12 個 Column,則會斷行放置多出來的 Column。
- 使用 Grid Class 會影響到大於或等於設定分段點的 Device,例如:使用
.col-md-*不僅會影響到 Desktop,若沒有設定.col-lg-*,還會影響到 Large Desktop。
Media Queries 的分段點
- Mobile – xs( < 768px )
- Tablet – sm( 768~991px )
- Desktop – md( 992~1200px )
- Large Desktop - lg( >= 1200px )
Grid Options
列表如下。
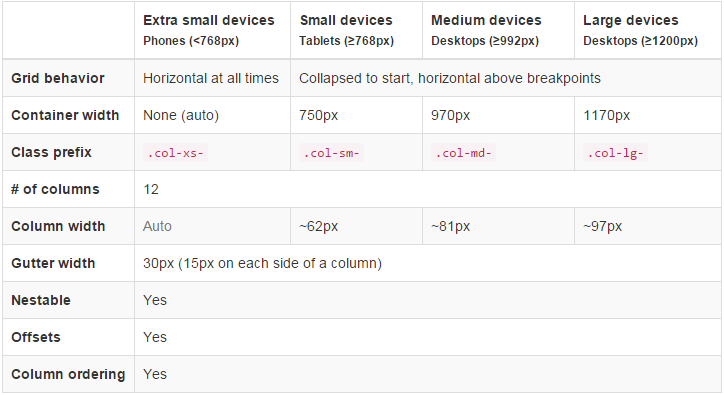
因此我們可以依此做基本的設定,在 Desktop 的結果如下:

Mobile 和 Tablet 就是垂直排列:
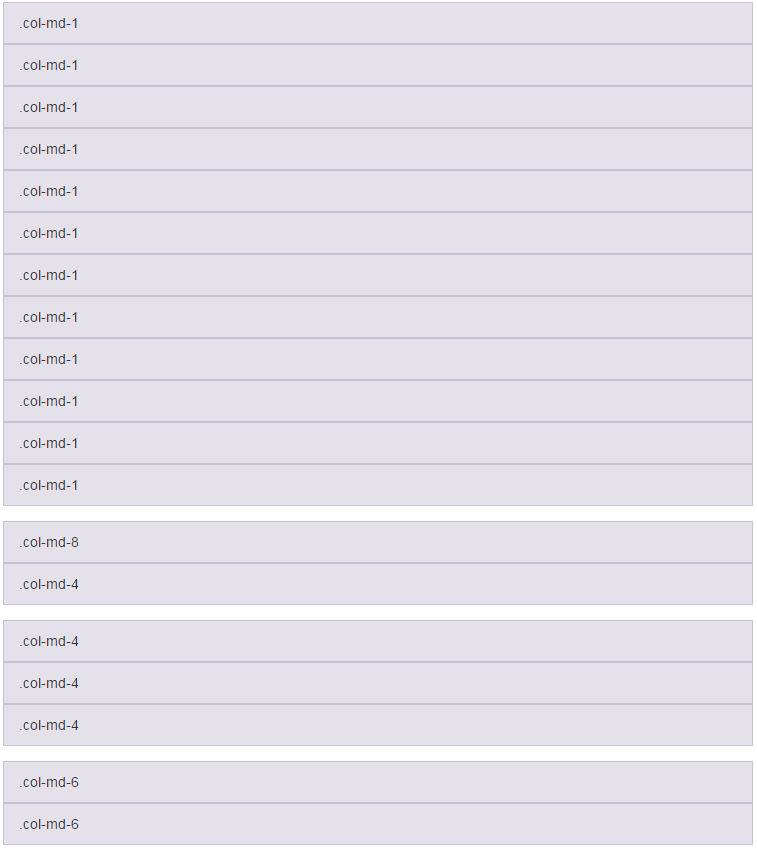
可參考官方網站範例。
針對不同 Device 混合使用
也許我們不想讓 Colume 在較小解析度的 Device 上全都垂直呈現,因為這樣非常單調無聊 - 那就混合使用這些 class 吧。每一種 class 單獨控制一種裝置,例如:col-xs-* 控制 Mobile,col-sm-6-* 控制 Tablet,col-md-* 控制 Desktop。
預覽如下圖。
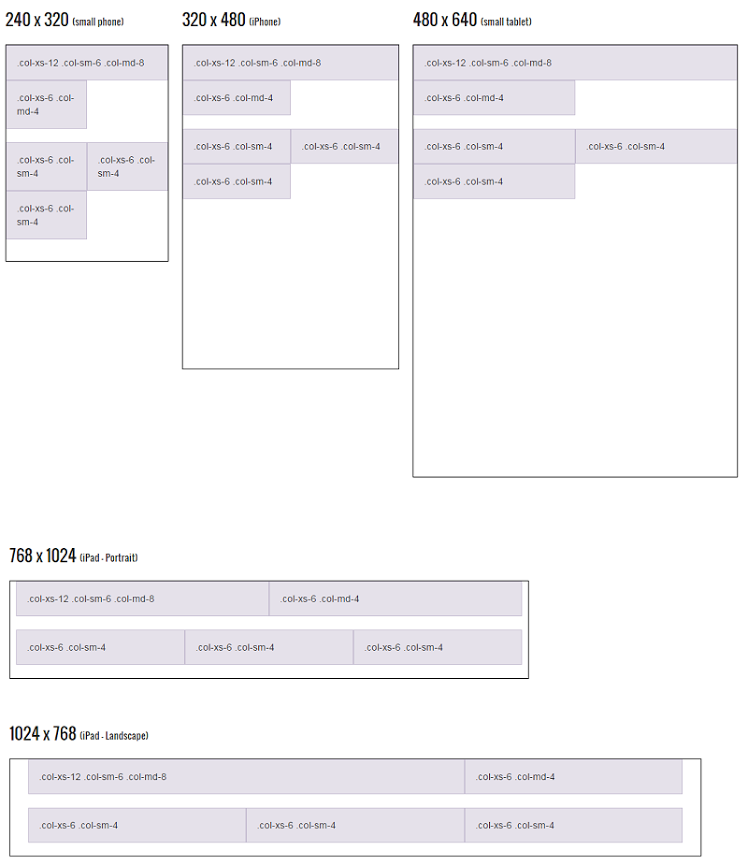
<!-- Mobile上各自一列, Tablet上兩欄比例各半、Desktop上兩欄比例為3:2  -->
<div class="row">
  <div class="col-xs-12 col-sm-6 col-md-8">.col-xs-12 .col-sm-6 .col-md-8</div>
  <div class="col-xs-6 col-md-4">.col-xs-6 .col-md-4</div>
</div>

<!-- Mobile上各佔一半, Tablet以上三欄各佔1/3 -->
<div class="row">
  <div class="col-xs-6 col-sm-4">.col-xs-6 .col-sm-4</div>
  <div class="col-xs-6 col-sm-4">.col-xs-6 .col-sm-4</div>
  <div class="clearfix visible-xs-block"></div>
  <div class="col-xs-6 col-sm-4">.col-xs-6 .col-sm-4</div>
</div>
Column Wrapping
基本上一個 Row 放置 12 個 Column,若有一個 Row 超過 12 個 Column,則會斷行放置多出來的 Column。

<div class="row">
<div class="col-xs-9">.col-xs-9</div>
<!-- 9 + 4 = 13 > 12,因此以下斷行放置多出來的Column -->
<div class="col-xs-4">
.col-xs-4<br />Since 9 + 4 = 13 > 12, this 4-column-wide div gets wrapped onto a new line as
one contiguous unit.
</div>
<div class="col-xs-6">.col-xs-6<br />Subsequent columns continue along the new line.</div>
</div>
可參考官方網站範例。
Responsive Column Resets
在某些分段點下,Column 沒有正確被擺放。這時就可以使用 .clearfix 和 responsive utility classes 來作修正。而在某些狀況下,可能還需要用到 reset offsets、pushes 或 pulls。
利用 col-md-offset-0、col-lg-offset-0 做修正。
<div class="row">
  <div class="col-sm-5 col-md-6">.col-sm-5 .col-md-6</div>
  <div class="col-sm-5 col-sm-offset-2 col-md-6 col-md-offset-0">
    .col-sm-5 .col-sm-offset-2 .col-md-6 .col-md-offset-0
  </div>
</div>

<div class="row">
  <div class="col-sm-6 col-md-5 col-lg-6">.col-sm-6 .col-md-5 .col-lg-6</div>
  <div class="col-sm-6 col-md-5 col-md-offset-2 col-lg-6 col-lg-offset-0">
    .col-sm-6 .col-md-5 .col-md-offset-2 .col-lg-6 .col-lg-offset-0
  </div>
</div>
正常版(左圖),如果沒有設定 class col-md-offset-0、col-lg-offset-0 就會壞掉唷(右圖)!

可參考官方網站範例。
Offsetting Columns
將 Column 向右移,意即向左填補空格。
<div class="row">
  <div class="col-md-4">.col-md-4</div>
  <!-- 向左填補4個Column -->
  <div class="col-md-4 col-md-offset-4">.col-md-4 .col-md-offset-4</div>
</div>
<div class="row">
  <div class="col-md-3 col-md-offset-3">.col-md-3 .col-md-offset-3</div>
  <!-- 向左填補3個Column -->
  <div class="col-md-3 col-md-offset-3">.col-md-3 .col-md-offset-3</div>
</div>
<div class="row">
  <!-- 向左填補3個Column -->
  <div class="col-md-6 col-md-offset-3">.col-md-6 .col-md-offset-3</div>
</div>

可參考官方網站範例
Nesting Columns
巢狀放置 Column。

<div class="row">
  <div class="col-sm-9">
    Level 1: .col-sm-9
    <div class="row">
      <div class="col-xs-8 col-sm-6">
        Level 2: .col-xs-8 .col-sm-6
      </div>
      <div class="col-xs-4 col-sm-6">
        Level 2: .col-xs-4 .col-sm-6
      </div>
    </div>
  </div>
</div>
可參考官方網站範例
Column Ordering
設定 Column 的順序 - .col-md-push-* 和 .col-md-pull-*。

<div class="row">
  <div class="col-md-9 col-md-push-3">.col-md-9 .col-md-push-3</div>
  <div class="col-md-3 col-md-pull-9">.col-md-3 .col-md-pull-9</div>
</div>
可參考官方網站範例
Less Mixins and Variables
使用 Less mixins and variables 來做客製化調整。雖然 Bootstrap 官網可以做些許客製化,但修改的幅度還是太小而且速度太慢了。最好的方式還是用 LESS 來修改。
使用 Prepros 將 .less 轉為 .css。
實作範例
範例 1
簡單暖身題,先練練基本指令。設定參數值:blue、gray、lime、white、sansFontFamily,當用到該值時使用參數(例如:@gray)即可。
/* Variables */
@blue: #049cdb;
@gray: #555;
@lime: #32cd32;
@white: #fff;
@sansFontFamily: 'PT Sans', Helvetica, Arial, sans-serif;

.blog-article {
  h2 {
    font-family: @sansFontFamily;
    color: @gray;
  }
}

/* Mixins */
.blue-background {
  background: url(path/img.png) 0 0 repeat-x @blue;
}

.blog-article {
  .blue-background;
}

.widget-box {
  color: @white;
  border: 2px solid @lime;
  .blue-background;
}
Output
Prepros 會幫我們輸出 CSS 檔案(如下)。
/* Variables */
.blog-article h2 {
  font-family: 'PT Sans', Helvetica, Arial, sans-serif;
  color: #555555;
}

/* Mixins */
.blue-background {
  background: url(path/img.png) 0 0 repeat-x #049cdb;
}

.blog-article {
  background: url(path/img.png) 0 0 repeat-x #049cdb;
}

.widget-box {
  color: #ffffff;
  border: 2px solid #32cd32;
  background: url(path/img.png) 0 0 repeat-x #049cdb;
}
範例參考 Using Bootstrap With LESS CSS – Tutorial。
範例 2
客製化 Bootstrap 的 label - 改變 label 的字體顏色為 #4400cc。
/* Import Bootstrap Less Files */
@import 'bootstrap.less';
@label-color: #4400cc;

.custom-label {
  .label;
}
Output
擷取客製化的部份程式碼。
.label {
  display: inline;
  padding: 0.2em 0.6em 0.3em;
  font-size: 75%;
  font-weight: bold;
  line-height: 1;
  color: #4400cc;
  text-align: center;
  white-space: nowrap;
  vertical-align: baseline;
  border-radius: 0.25em;
}
Demo
當使用 HTML Tag 如下,Custom Label 變呈現先前設定的紫色樣貌。
<label class="custom-label">
  Custom Label
</label>
範例 3
LESS 的部份
.wrapper {
  .make-row();
}

.content-main {
  .make-sm-column(8);
}

.content-secondary {
  .make-sm-column(4);
}
輸出的 CSS 部份
.wrapper {
  margin-left: -15px;
  margin-right: -15px;
}

.content-main {
  position: relative;
  min-height: 1px;
  padding-left: 15px;
  padding-right: 15px;
}

@media (min-width: 768px) {
  .content-main {
    float: left;
    width: 66.66666667%;
  }
}

.content-secondary {
  position: relative;
  min-height: 1px;
  padding-left: 15px;
  padding-right: 15px;
}

@media (min-width: 768px) {
  .content-secondary {
    float: left;
    width: 33.33333333%;
  }
}
HTML 的部份
<div class="container">
  <div class="wrapper">
    <div class="content-main">
      <div class="box">
        <div class="box-heading">
          <img src="images/food_bread.jpg" />
        </div>
        <div class="box-body">
          <h3>Bread</h3>
          <p>
            Li Europan lingues es membres del sam familie. Lor separat existentie es un myth. Por
            scientie, musica, sport etc, litot Europa usa li sam vocabular. Li lingues differe
            solmen in li grammatica, li pro
          </p>
        </div>
      </div>
    </div>
    <div class="content-secondary">
      <div class="box">
        <div class="box-heading">
          <img src="images/food_strawberry.jpg" />
        </div>
        <div class="box-body">
          <h3>Strawberry</h3>
          <p>Por scientie, musica, sport etc. Li lingues differe solmen in li grammatica, li pro</p>
        </div>
      </div>
    </div>
  </div>
</div>
Demo

可參考官方網站範例
範例 4
除了使用.make-row(),也混合使用.make-xs/sm/md/lg-column()。
LESS 的部份
.left-and-right {
  .make-row();

  .left {
    .make-sm-column(1);
    .make-md-column(7);
    .make-lg-column(4);
  }

  .right {
    .make-sm-column(11);
    .make-md-column(5);
    .make-lg-column(8);
  }
}
輸出的 CSS 部份
.left-and-right {
  margin-left: -15px;
  margin-right: -15px;
}

.left-and-right .left {
  position: relative;
  min-height: 1px;
  padding-left: 15px;
  padding-right: 15px;
}

@media (min-width: 992px) {
  .left-and-right .left {
    float: left;
    width: 50%;
  }
}

.left-and-right .right {
  position: relative;
  min-height: 1px;
  padding-left: 15px;
  padding-right: 15px;
}

@media (min-width: 992px) {
  .left-and-right .right {
    float: left;
    width: 50%;
  }
}

.left-and-right {
  margin-left: -15px;
  margin-right: -15px;
}

.left-and-right .left {
  position: relative;
  min-height: 1px;
  padding-left: 15px;
  padding-right: 15px;
}

@media (min-width: 768px) {
  .left-and-right .left {
    float: left;
    width: 16.66666667%;
  }
}

@media (min-width: 992px) {
  .left-and-right .left {
    float: left;
    width: 58.33333333%;
  }
}

@media (min-width: 1200px) {
  .left-and-right .left {
    float: left;
    width: 33.33333333%;
  }
}

.left-and-right .right {
  position: relative;
  min-height: 1px;
  padding-left: 15px;
  padding-right: 15px;
}

@media (min-width: 768px) {
  .left-and-right .right {
    float: left;
    width: 83.33333333%;
  }
}

@media (min-width: 992px) {
  .left-and-right .right {
    float: left;
    width: 41.66666667%;
  }
}

@media (min-width: 1200px) {
  .left-and-right .right {
    float: left;
    width: 66.66666667%;
  }
}
HTML 的部份
<div class="container">
  <div class="left-and-right">
    <div class="left">
      <div class="box">
        <div class="box-heading">
          <img src="images/food_bread.jpg" />
        </div>
        <div class="box-body">
          <h3>Bread</h3>
          <p>Li Europan lingues es membres del sam familie. Lor separat existentie es un myth.</p>
        </div>
      </div>
    </div>
    <div class="right">
      <div class="box">
        <div class="box-heading">
          <img src="images/food_strawberry.jpg" />
        </div>
        <div class="box-body">
          <h3>Strawberry</h3>
          <p>
            Por scientie, musica, sport etc. Por scientie, musica, sport etc. Por scientie, musica,
            sport etc. Por scientie, musica, sport etc.
          </p>
        </div>
      </div>
    </div>
  </div>
</div>
Demo
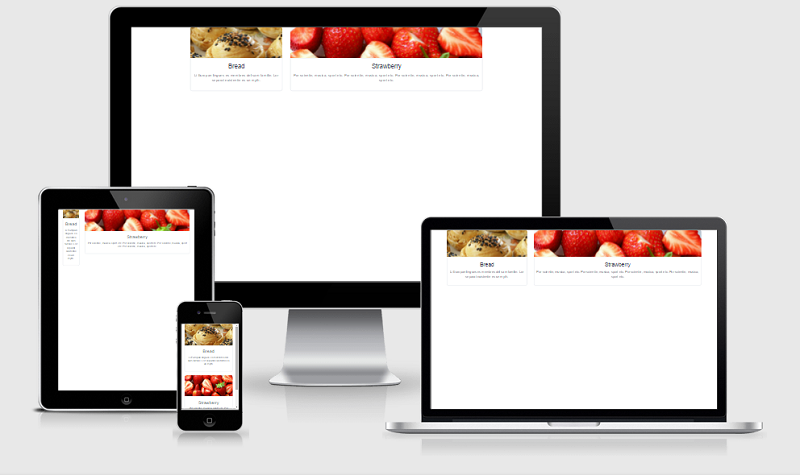
Note - Mixins 列表。
推薦閱讀
Bootstrap Gripd System 相關
- Bootstrap 3 Grid Introduction - Experience Design at Hello Erik
- The Subtle Magic Behind Why the Bootstrap 3 Grid Works - 將觀念清楚圖示
- 建立自己的 Grid System,Source Code & Demo
Bootstrap Less Mixins and Variables 相關
- A Comprehensive Introduction to LESS: Mixins
- Bootstrap 3 Less Workflow Tutorial
- Using Bootstrap With LESS CSS – Tutorial
- 5 Useful Sass Mixins in Bootstrap - 常用的 Mixins
- Mixins 列表 - 官方教學
- Twitter Bootstrap’s Undocumented Mixins - 其他可用的 Mixins
Bootstrap 版本相關
- Bootstrap 2.x 與 3 的重要差異(一):Overview
- Bootstrap 2.x 與 3 的重要差異(二):grid 系統的變革
- 迷.夢: Bootstrap 3.0 (RC2) 過渡筆記
RWD 觀念相關
- Responsive Patterns - A collection of patterns and modules for responsive designs.
- 行動網站開發:RWD 實作心得 01
- 響應式網頁(Responsive Web Design)實作筆記 - 使用 Media Query 簡單做 RWD 網頁
- 使用 Bootstrap 建立一個 RWD Template(Twitter Bootstrap in Responsive Web Design) - 利用 Bootstrap 做 RWD 樣版,含 Navbar、Jumbotrol、Grids、Panel、Forms、Wells、Footer,Viewport Meta Tag 的注意事項與 Mobile Search 相關探討
這篇文章的原始位置在這裡-利用 Bootstrap Grid System 排版的學習筆記
由於部落格搬遷至此,因此在這裡放了一份,以便閱讀;部份文章片段也做了些許修改,以期提供更好的內容。
